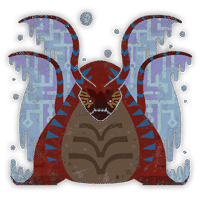
Uth Duna
Large Monster
The leviathan that reigns supreme over the Scarlet Forest's ecosystem. It has adapted to water-rich environments and is sighted most often during the Downpour. Uth Duna's secretions when combined with water form a protective veil that not only absorbs hostile blows but also adds weight , which it slams down with enough force to sweep away surrounding threats in the resulting wave.
Guide and Information
The leviathan that reigns supreme over the Scarlet Forest's ecosystem. It has adapted to water-rich environments and is sighted most often during the Downpour. Uth Duna's secretions when combined with water form a protective veil that not only absorbs hostile blows but also adds weight , which it slams down with enough force to sweep away surrounding threats in the resulting wave.
Drops
Uth Duna Claw +
Rarity: 4
Drop Rate: Target: 8% Capture: 100% (Right Foreleg)100% (Lef Foreleg) Break: 13%
Uth Duna Scale +
Rarity: 3
Drop Rate: Target: 18% Break: 30% Carve: 45%
Uth Duna Cilia +
Rarity: 3
Drop Rate: Target: 14% Capture: 93% (Tail) Break: 18% Carve: 12%
Uth Duna Tentacle +
Rarity: 3
Drop Rate: Target: 8% Capture: 100% (Head) Break: 11%
Uth Duna Hide +
Rarity: 2
Drop Rate: Target: 18% Break: 23% Carve: 43%
Torrent Sac
Rarity: 2
Drop Rate: Target: 16%
Uth Duna Certificate S
Rarity: 1
Drop Rate: Target: 8%
Uth Duna Plate
Rarity: 1
Drop Rate: Target: 7%
Uth Duna Watergem
Rarity: 1
Drop Rate: Target: 3% Capture: 7% (Tail) Break: 5%
Uth Duna Claw
Rarity: 4
Drop Rate: Target: 8% Capture: 100% (Right Foreleg)100% (Left Foreleg) Break: 13%
Uth Duna Scale
Rarity: 3
Drop Rate: Target: 20% Break: 28% Carve: 45%
Uth Duna Cilia
Rarity: 3
Drop Rate: Target: 15% Capture: 88% (Tail) Break: 18% Carve: 12%
Uth Duna Tentacle
Rarity: 3
Drop Rate: Target: 8% Capture: 100% (Head) Break: 11%
Uth Duna Hide
Rarity: 2
Drop Rate: Target: 20% Break: 23% Carve: 43%
Aqua Sac
Rarity: 2
Drop Rate: Target: 16%
Uth Duna Certificate
Rarity: 1
Drop Rate: Target: 8%
Uth Duna Plate
Rarity: 1
Drop Rate: Target: 5% Capture: 12% (Tail) Break: 7%
Attacks
Arm Sweep -
Uth Duna will use on of its forelegs to sweep at the units on its sides. Hunters can get blown away if this hits them directly.
Belly Flop
- Uth Duna will shift its weight on one side to prepare to flip its body around. When it's ready, it will turn and smash the ground with its belly.
Body Slam
- The Uth Duna rises and stands on its hind legs. After pausing briefly, it will slam its arms and body on the ground.
Bite Attack
- The Uth Duna opens its mouth, pauses briefly, and then rushes forward to bite the target in front of it, then does another bite. It can do this move for up to 2 times.
Dive Combo Attack
- As Uth Duna rises to stand on its hind legs, it will fall forward to dive, and then rise once again to do a body slam.
Overhead Smash
- As it slowly backs away, Uth Duna raises its right/left foreleg above its head to prepare for an Overhead attack. This attack is aimed directly at the unit in front of it.
Overhead Sweep
- Uth Duna raises its right/left foreleg above its head to prepare for an Overhead attack. Instead of smashing the ground, it will sweep its arm sideways. This attack is aimed directly at the unit in front of it.
Twisted Body SlamAoE
Twisted Body Slam - This attack starts with Uth Duna twisting its body as it prepares to launch forward, like a tornado. As it gains momentum, it will slam its body on the ground. This attack has a wide AoE and causes a wave of water from the point of impact. It can repeat this move up to 2 times.
Underwater Dive
- This move is similar to the Twisted Body Slam, but the Uth Duna will come from underwater. It causes a wave of water that can damage hunters. It can repeat this move up to 2 times. (This can also replenish the wings or protective skin that covers the Uth Duna's body).
Weapons
- Balahara Exploder I
- Balahara Hammer I
- Balahara Horn I
- Balahara Glaive I
- Balahara Lance I
- Balahara Blade I
- Uth Khviluk I
- Uth Valeroje I
- Uth Ngarpatu I
- Uth Falarmata I
- Uth Dalgap I
- Uth Khlunda I
- Uth Olacha I
- Guild Knight Sabers I
- Uth Khviluk II
- Uth Valeroje II
- Uth Ngarpatu II
- Balahara Exploder III
- Uth Falarmata II
- Balahara Hammer III
- Uth Dalgap II
- Balahara Horn III
- Balahara Glaive III
- Balahara Lance III
- Uth Khlunda II
- Uth Olacha II
- Balahara Blade III
- Guild Knight Sabers II
- Uth Khviluk III
- Chata Strongarm IV
- Uth Valeroje III
- Uth Ngarpatu III
- Balahara Exploder IV
- Uth Falarmata III
- Balahara Hammer IV
- Chata Clobberer IV
- Chata Sheller IV
- Uth Dalgap III
- Balahara Horn IV
- Balahara Glaive IV
- Chata Glaive IV
- Balahara Lance IV
- Uth Khlunda III
- Uth Olacha III
- Balahara Blade IV
- Chata Club IV
- Khviluk-of-the-Waves
- Valeroje-of-the-Waves
- Master Sabers
- Ngarpatu-of-the-Waves
- Falarmata-of-the-Waves
- Sandsea Visponan
- Sandsea Siamitiya
- Dalgap-of-the-Waves
- Sandsea Ghantisil
- Sandsea Uchaltiya
- Sandsea Prallaya
- Khlunda-of-the-Waves
- Olacha-of-the-Waves
- Sandsea Katduva
Armors
- Balahara Set
- Uth Duna Set
- Balahara Alpha Set
- Balahara Beta Set
- Xu Wu Alpha Set
- Xu Wu Beta Set
- Uth Duna Alpha Set
- Uth Duna Beta Set
- Guardian Arkveld Alpha Set
- Guardian Arkveld Beta Set
Ailments
- Waterblight
Elements
- Water
Habitats
- Scarlet Forest
Weaknesses
- Thunder
Gallery